Micrometers are used for more accurate measuring than can be achieved with a measuring rule or a slide caliper. Micrometers are available with metric and imperial graduations.
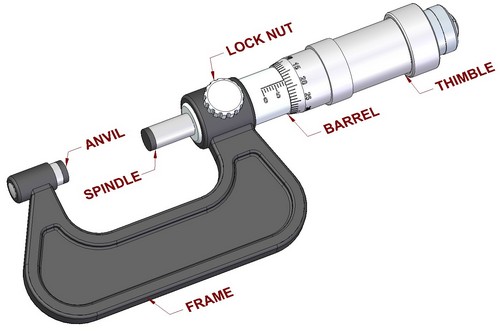
The micrometer consist of a semicircular frame having a cylidrical extension, the barrel (sleeve), at its right end and a hardened anvil at the other end. The bore of the barrel (sleeve) is threaded and a spindle screws into the bore. The spindle carries a graduated thimble which turns at one with it.

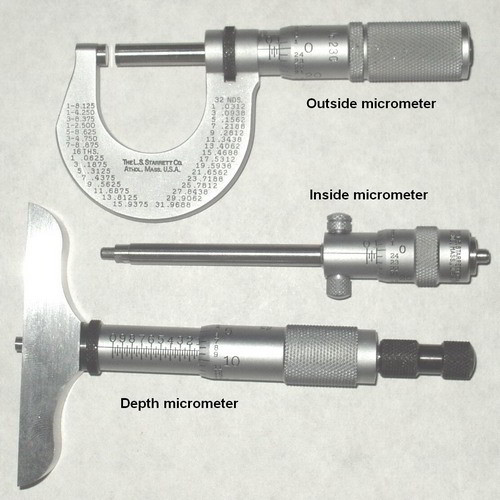
There are three types of micrometers which are commonly used: the outside micrometer, the inside micrometer, and the depth micrometer.
OUTSIDE MICROMETERS
Outside micrometers are used to measure an outside distance or diameter to an accuracy of .001 of an inch.
INSIDE MICROMETERS
Inside micrometers are used to measure an inside diameter to an accuracy of .001 of an inch.
DEPTH MICROMETERS
Depth micrometers are used to measure depths to an accuracy of .001 inches.
- Parts of the micrometer
Micrometers have been fitted with two refinements which are great help to the user. The first of these is the spindle lock which is a device which enables the spindle to be positively locked in any positions. The micrometer can be set to a desired position and then locked. The second refinement is the ratchet stop and this is a device placed on the end of the thimble. Only a relatively slight pressure on the thimble can result in a considerable force being exerted between the two anvils. If the force were to be excessive then it would be possible to overstress the frame thus causing permanent damage to the micrometer which would in turn lead to incorrect readings being obtained. To overcome this problem the ratched stop is fitted and this drives the thimble through a ratchet device.
Reading an imperial micrometer
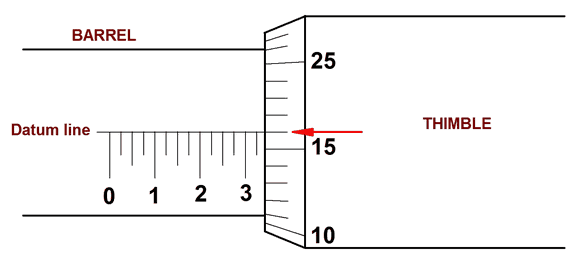
Reading a micrometer is only a matter of reading the micrometer scale or counting the revolutions of the thimble and adding to this any fraction of a revolution. The micrometer screw has 40 threads per inch. This means that one complete and exact revolution of the micrometer screw moves the spindle away from or toward the anvil exactly 1/40 or 0.025 inch.
The lines on the barrel conform to the pitch of the micrometer screw, each line indicating 0.025 inch, and each fourth line being numbered 1, 2, 3, and so forth. The beveled edge of the thimble is graduated into 25 parts, each line indicating 0.001 inch, or 0.025 inch covered by one complete and exact revolution of the thimble. Every fifth line on the thimble is numbered to read a measurement in thousandths of an inch.

- TO READ A MEASUREMENT AS SHOWN ABOVE.
Read highest figure visible on barrel.. . . . . 3 x 0,1in = 0.300 in.
Number of lines visible between the No. 3 and thimble edge. . . . . . . 1 x 0,025in = 0.025 in.
The line on the thimble that coincides with or has passed the revolution or long line in the barrel . . .. . . . 16 x 0,001in = 0.016 in.
TOTAL = 0.300in + 0,025in +0,016in = 0,341in
Reading a metric micrometer
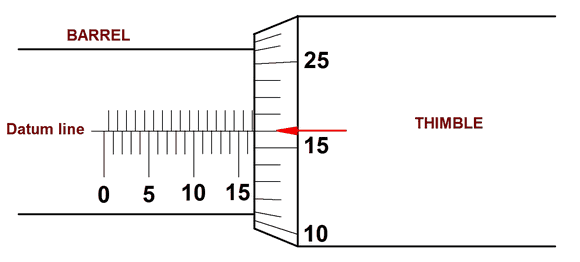
The same principle is applied in reading the metric graduated micrometer, but the following changes in graduations are used: The pitch of the micrometer screw is 0.5 mm. One revolution of the spindle advances or withdraws the screw a distance equal to 0.5 mm.
On the barrel the datum line is graduated with two sets of lines, the one below the datum reading in millimetres and the set above reading in half millimetres. The thimble scale is marked in fifty equal divisions, figured in fives, so that each small division on the thimble represents 1/50 of 1/2mm which equals 1/100mm , which is 0,01mm.

- TO READ MEASUREMENT AS SHOWN ABOVE:
First note the whole number of mm divisions on the barrel (major divisions below datum line) ........... 15 x 1,0mm = 15,00mm
Then observe whether there is a half mm visible (minor divisions above datum line)............3 x 0,50mm = 1,50mm
Finally read the line on the thimble coinciding with the datum line. This gives hundredths of a mm. ........... 16 x 0,01mm = 0,16mm
TOTAL: 15,00mm = 1,50mm + 0,16mm = 16,66mm
DIGITAL MICROMETERS
Digital micrometer is very accurate and does involve the computations needed by a standard micrometer. When the spindle and anvil come in contact with the workpiece, the measurement can be read directly from a digital display.
CARE OF THE MICROMETERS
- Coat metal parts of all micrometers with a light coat of oil to prevent rust.
- Store micrometers in separate containers provided by manufacturer.
- Keep graduations and markings on all micrometers clean and legible.
- Do not drop any micrometer. Small nicks or scratchescan cause inaccurate measurements.
