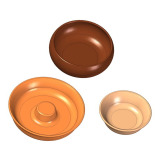
We are offering you the wooden bowl plans for several different models of the nut bowls, a perfect craft fair items to sell.
These wooden bowls seem simple, but their production requires a good knowledge of the wood properties, woodturning and finishing techniques, so the woodworkers agree, that making wooden bowls is not for beginners.
A bowl is a simple open-top vessel used to serve food, beverages or to store various trinkets and keepsakes. In general, a bowl can be made out of different materials such as wood, pottery, plastic, glass, ceramics, stone, and many other materials. Bowls are wide and shallow vessels and their width is usually twice the size of their depth. Their design can range from very simple ones to the sophisticated artworks. People have been using them for thousands of years – they were found on archaeological sites of all ancient civilizations. According to some sources, the oldest known pottery bowl is about 18.000 years old. Today, the bowls are mostly used for serving salads, fruits, nuts and various snack, but also as the decorative objects.
Wooden bowls are very popular items for manufacturing among the woodturners and artists. Their manufacture challenges and offers opportunities to implement many woodturning skills. Wooden bowls can be functional or decorative, have different shapes and sizes. To highlight the beauty of wood, it is common to use transparent finish, so that each wooden bowl has unique look because of the specific wood pattern.

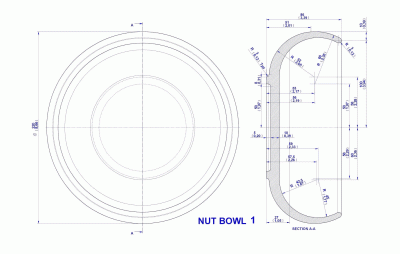
Turned nut bowl (Version 1) - 220mm (8.66'') in diameter and 86mm (3.39'') thickness
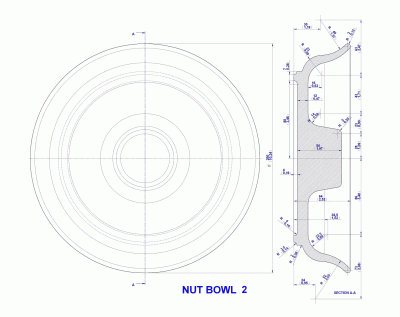
Turned nut bowl (Version 2) - 260mm (10.24'') in diameter and 10mm (0.39'') thickness
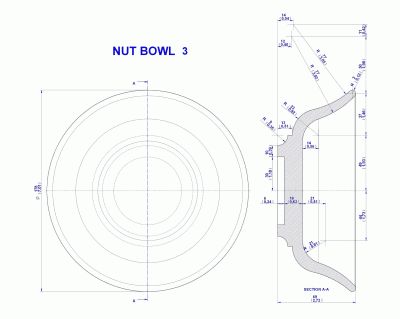
Turned nut bowl (Version 3) - 69mm (2.72'') in diameter and 10mm (0.39'') thickness
Wooden bowls are made by woodturning technique. So, when choosing the wood, it is recommended to select a type of wood that responds well to woodturning. Bowls are often made by technique called „green woodturning“ which implies turning of green, not dried wood. There are a few very good reasons for this. First, bowl manufacture requires large blank of wood. Kiln drying of such large blanks is expensive and complicated while air-drying takes time, so purchase of such blanks is almost impossible. Besides that, soft wet wood cuts very easily and the moisture in the wood keeps the cutting tools cooler which means longer life for blades. Moisture eliminated almost all saw dust, and rarely appear end-grain tearout.
Problem with a turning of the green wood is shrinkage during seasoning. Green wood shrinks unevenly. The greatest shrinkage is across the grain, while there is very little movement along the length. Uneven shrinkage can cause cracking and checks, especially if the bowl walls are not cut to uniform thickness. Regardless the proper drying process, you have to calculate with some loss because certain bowls will probably crack during the drying. From the other side, this shrinkage can yield very interesting and unpredictable shapes of bowl.
Green woodturning is done in several phases: the first phase is the rough cutting and the wall thickness is left approximately 10% of bowl diameter. It is very important that the wall thickness is uniform to minimize checking and excessive stress during drying. Primarily turn the rough exterior profile and only after that hollow the bowl. After that, the bowl is being wrapped into 20-30 layers of paper or wax with cold wax emulsion and left to dry on a warm place for several weeks or months or more. Duration and method of drying depends on the wood type. After drying comes the finish turning and sanding of bowl. The finish turning turns the walls to desired thickness and eliminates eventual cracks that may occur during the drying. Sand the bowl in several stages – start with coarse or medium sandpaper, and go through the grits to the super fine, for a perfect smooth finish.


The first step in manufacturing the wooden bowl is a good selection and cutting of wood of the adequate size and thickness for the chosen project. Choose some nice figured wood which respond well on woodturning and finish. Wooden blank can be cut from the log in several ways in relation to the grain direction. There are two basic options: Face (side) grain or End grain blanks. Cutting the log lengthwise creates face grain bowl blanks. Crosscutting the log creates end grain bowl blanks. Most turners prefer face grain bowls. The final wood figure on bowl highly depend on the blanks orientation (wood grains and growth rings orientation) on the lathe (concave up or concave down) and from chosen radius of curvature. The same wood blank can yield the bowl of completely different appearance only by changing of bowl curvature. Experienced woodturners also can turn the bowls with natural edges which mean leaving the bark on the bowl edge. The bark provides a quite unusual and natural look to the bowl.
Different types of wood can be used to make the wooden bowls – mostly hardwoods. The color contrast inside of the wood, irregularities in the growth and various damages that resulted in discoloration can make very unusual and beautiful bowls. Some of the used wood types are: Oak, Ash, Elm, Maple, Cherry, Hickory, Poplar, Mahogany, Walnut, Birch, Acacia, Eucalyptus, Sycamore and many others. Ash is often used because the wood has no taste; black walnut is suitable because it responds well to woodturning. Each wood species has its own characteristics, advantages and disadvantages. Bowls can be made from the single piece of wood, but there are also many combinations of different types of wood that are first glued together and then turned. This way you can achieve amazing and totally unexpected wood patterns and combinations of colors.
After the turning and sanding, the bowl is finished. Then the finish may or may not be applied – it depends on the decision and taste of the person that will use the bowl, but on the purpose of the bowl as well. As a finish, there can be used a mineral oil, walnut oil, wax, special salad bowl finish, lacquer or paint. Bowls are commonly made in such way that the finish is highlighting the texture and color of wood, so the clear, transparent finishes are often used. When selecting a finish, special attention should be paid on health safety. If the bowl is intended for serving the food, be sure to use a food safe protective finish or no finish at all. Protective finish is a must on open grained woods and on softer woods used for wet foods. If the bowl has only an aesthetic function, any desired finish can be used.
Maintain the wooden bowls by hand-washing in warm water with the dish detergent and wipe it with a dry cloth immediately. Do not leave it for a long time submerged in water. Never wash it in the dishwasher because the wood will crack. For the same reason, you should never put wooden bowls in the oven or microwave.
There are many websites about bowls making that are created by professionals and enthusiasts. Some of them offer detailed instructions and tips in the texts and images including all the steps for making the bowls – from the wood selection, cutting, turning, to the finish. In addition to the manufacture instructions, there you can also found many notes about various characteristics during the manufacture and prevention of some possible problems. While browsing through the works of these people, your imagination will evoke, and you will desire to make more bowls than you originally planned!