Vernier calipers are used for more accurate measuring than can be achieved with a measuring rule or a slide caliper. It is capable of measuring internal and external dimensions and can also be used as a depth gauge.
If you need 3D model of a Vernier caliper, please visit this page: 3D model of Vernier caliper
Vernier calipers work like slide caliper. Vernier calipers are available with metric and imperial graduations.
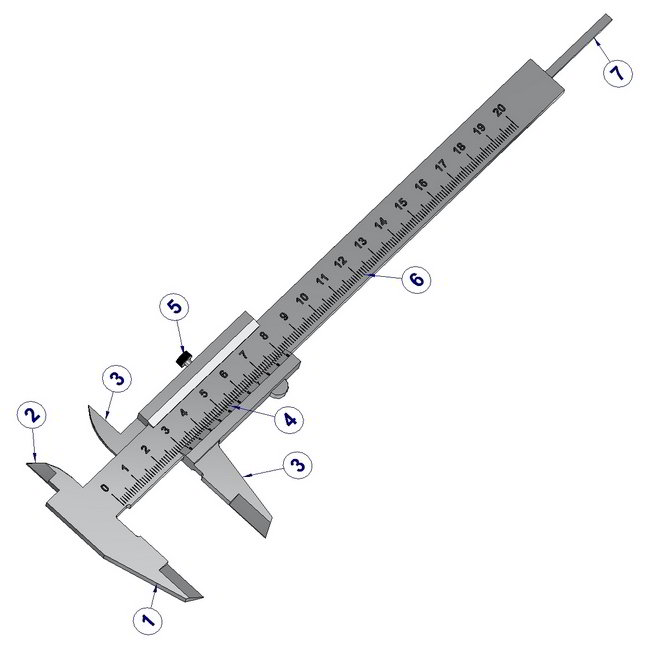
Parts of the Vernier caliper
- External jaw
- Intenal jaw
- Sliding jaws
- Metric Vernier scale
- Locking screw
- Main scale
- Depth gauge
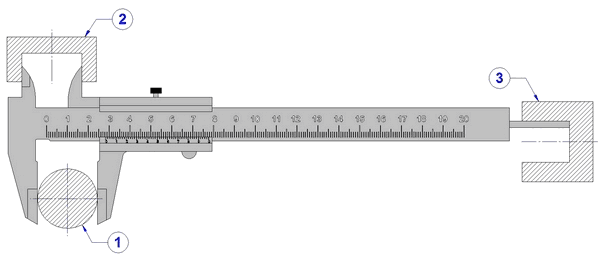
Measuring with a Vernier caliper
- Measuring external dimensions
- Measuring internal dimensions
- Measuring depth dimensions
MEASURING WITH METRIC VERNIER CALIPER TO WITHIN 0,02mm
Each division on the main scale is 1mm. The metric vernier scale is 49mm long and divided into 50 equal parts. Each division is 49/50, which is equal to 0,98mm. The difference between one division on the main scale and one division on the metric vernier scale is 1/50 or 0,02mm.
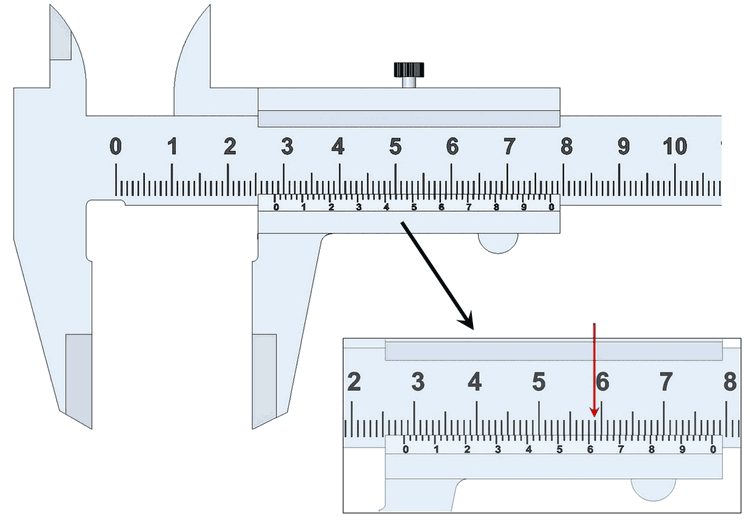
- Read the measurement as shown above.
To read the measurement note the main scale measurement immediately preceding the zero line on vernier scale.
The zero of the vernier scale immediately preceding 28mm. To this (28mm) must be added the decimal reading on the vernier scale. Note the line on the vernier scale which is coincident with a line on the main scale.
30th line concides with a line on the main scale.
So the reading is 28mm plus 30 divisions of 0,02mm
TOTAL: 28mm + 30 * 0,02 = 28,6mm
MEASURING WITH IMPERIAL VERNIER CALIPER TO WITHIN 0,001in
The main scale on the vernier is graduated and numbered in inches with each inch graduated and numbered in tenths (0,1in). Each tenth is divided into four giving 0,1in. divided by 4 = 0,025in. On the vernier scale 0,6in is divided into 25 parts. Each of these has a length of 0,6in divided by 25 = 0,024in. The difference in length between a small division on the main scale and the vernier scale is 0,025- 0,024 = 0,001in.
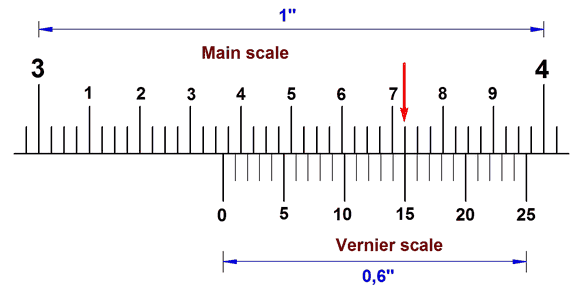
- Read the measurement as shown above.
To read a measurement note the position of the zero line on the vernier scale in relation to the main scale. This is shown as 3,00in plus 0,300in plus 2*0,025in which equals 3,35in. To this must be added the number of divisions from the zero line on the vernier scale to the line which is coincident witha line on the main scale, in this case 15 divisions which equals 0,015in the total reading is therefore:
Main scale = 3,35in
Vernier scale = 0,015in
So the reading is 3,35in + 0,015 = 3,365in
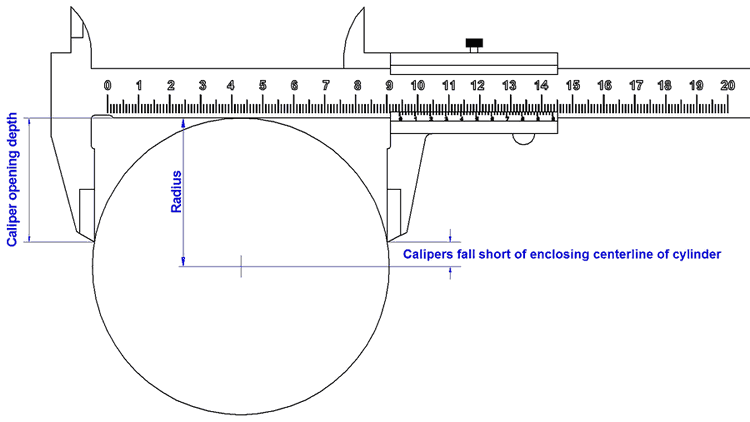
The vernier caliper should not be used to measure the outside diameter of a cylinder having a radius greater than the depth of the caliper opening.
DIGITAL VERNIER CALIPERS
Digital vernier caliper is very accurate and does involve the computations needed by a standard vernier caliper. When the jaws come in contact with the workpiece, the measurement can be read directly from a digital display.
CARE OF CALIPERS:
- Store calipers in separate containers provided
- Keep graduations and markings on all calipers clean and legible
- Do not drop any caliper. Small nicks or scratches can cause inaccurate measurements
- Protect caliper points from damage.