To keep the shoes you use most tidy, taking up little space and yet be easily accessible, make a shoe rack.
In almost every apartment or house there is an entrance hall with a shoe storage cabinet. Most people keep only the less used footwear in it and the most used footwear is left on the floor. If your family is large, or guests come over for a visit, the hallway may become crowded with shoes, which is neither neat nor practical. We suggest you take a look at the shoe rack whose DIY plan is presented here; if you are pleased with its appearance and function, go ahead and make one in your workshop!
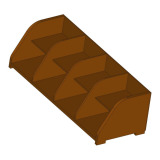
This project was drawn using the free 3D CAD software FreeCAD.
Size of the completed shoe rack according to our plan are: Length 406mm (1' 3+31/32''), Width 1084mm (3' 6+11/16'') and Height 330mm (1' 1'')
The shoe rack is very simple and consists of several parts. You can make a shoe rack either from solid wood or plywood. The sides, bottom and shelf parts need to be glued together so that the bottom is glued to the sides using dowels, while a tab and slot woodworking joint is used for the connection between the shelf and the sides. The back part of the structure is fastened to the construction with screws or nails. The partition side parts (Part 5 - Divider) are not glued but attached - to the shelf with the interlocking joint, and to the bottom with the dado woodworking joint.
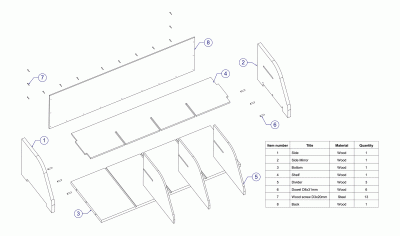
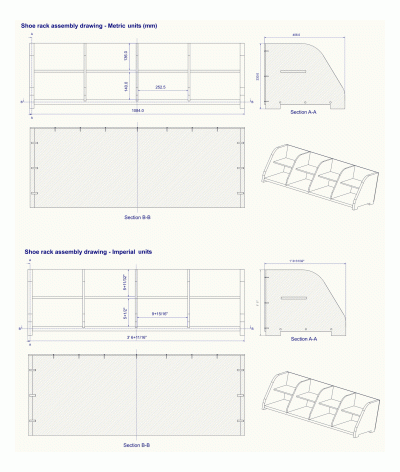
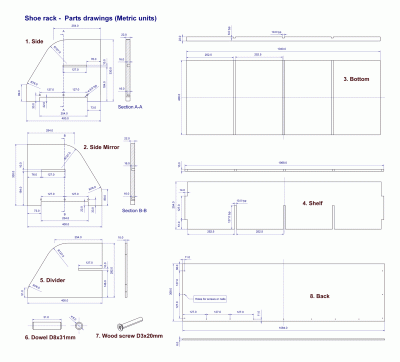
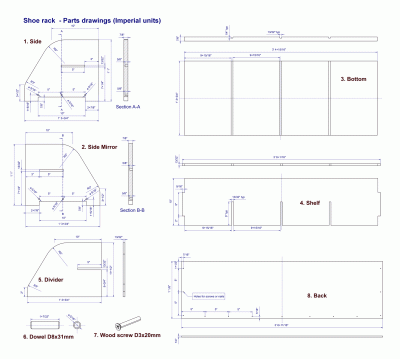
Building a shoe rack according to this plan is not difficult, and beginners too can embark on this project. A big advantage is that you can adjust its dimensions and design to your needs.
You can change the following:
- Number of compartments - our construction has 10 compartments and one pair of shoes can be placed in each; compartment number can be either reduced or increased.
- Dimensions of compartments - there are shoes of various sizes (loafers, boots, children's shoes...) so it is a good idea to adjust the compartment dimensions to the shoes for which the shoe rack is intended.
- Number of compartment levels - Our shoe rack has only two levels of compartments, you can easily add a third one if you like.
- Woodworking joints - you can connect parts in different ways, i.e., you do not have to use the same woodworking joints as in our plan.
- Thickness of boards from which the parts are made can also be changed.
As you can see, this shoe rack can be completely modified and adapted to your needs. Prior to making any changes, you are advised to carefully analyze the drawings to avoid errors. Since the partition sides are not glued, i.e., they can always be pulled out, the shoe rack is easy to clean and also finish.